
KNCMiner Saturn/Jupiter Setup Guide
Contents:
0a) What to expect?
0b) What you need
1) Powering
2) Cooling
3) Case
4) Configuration
5) Troubleshooting
6) Where to buy
0a) What to expect?
0b) What you need
1) Powering
2) Cooling
3) Case
4) Configuration
5) Troubleshooting
6) Where to buy
0) What to expect
The KNC Jupiter and Saturn are standalone miners and require no external controller. They house 4 and 2 mining modules respectively, hashing at 550GH and 275GH.
The KNC Jupiter and Saturn are standalone miners and require no external controller. They house 4 and 2 mining modules respectively, hashing at 550GH and 275GH.

0b) What you need
You will need the following:
You will need the following:
- A network cable.
- 1x Fan controller.
- 3x 120mm PWM controllable fans.
- A power supply (see next section)
1) Powering
Jupiters and Saturns do not come with a power supply, and you will need a typical computer PSU with:
Jupiter (4 module):
I would recommend the following PSUs:
Jupiters and Saturns do not come with a power supply, and you will need a typical computer PSU with:
- 1xPCI-E 6 pin power connector per module
- At least 30A on the/each 12V rail
Jupiter (4 module):
- 600W
- 300W
I would recommend the following PSUs:
|
Saturn:
Jupiter: |


|


|


|
|


We also need to tell the PSU to always be on, as there isn't a motherboard to do this. Cut a paperclip into a U and insert it into the green wire and either black wire to the side of the green wire. Tape it up for safety. The power supply will now be controlled by its switch on the rear socket.
Each module requires its own PCI-E connector which is hung out the front of the case. Additionally, the control board must be powered with a 4 pin molex connector.
Each module requires its own PCI-E connector which is hung out the front of the case. Additionally, the control board must be powered with a 4 pin molex connector.

|

|
2) Cooling
Both the Jupiter and Saturn cases come with two 140mm intake fans, and each module has its own Arctic Freezer Freezer i30 heatsink. Cooling is sufficient and quiet, but can be improved to reduce hardware errors and increase hash rates. I'd recommend adding 3x120mm fans exhausting at the rear, cable tied in position:
Both the Jupiter and Saturn cases come with two 140mm intake fans, and each module has its own Arctic Freezer Freezer i30 heatsink. Cooling is sufficient and quiet, but can be improved to reduce hardware errors and increase hash rates. I'd recommend adding 3x120mm fans exhausting at the rear, cable tied in position:
|
Fan Controller:
120mm Fans: |


|


|


|
|


|
|
3) Case
KNCMiner cases are self standing and designed to be stackable. They are very light weight due to being made of sheet aluminium. Rubber feet can be added between stacked cases to reduce vibration.
KNCMiner cases are self standing and designed to be stackable. They are very light weight due to being made of sheet aluminium. Rubber feet can be added between stacked cases to reduce vibration.
4) Configuration
Pool addresses are entered like this:
- Power on as above.Navigate to the 'Status' tab and confirm cgminer is running.
- Plug in a network cable from the miner to your router.
- Log into your router and find the IP assigned to the miner.
- Using a browser navigate to the IP - this goes to the configuration page.
- Login using 'admin' as both the user and password.
- Navigate to 'Mining' and enter your pool address (including port) and login information. Save and apply.
Pool addresses are entered like this:
mint.bitminter.com:3333
us1.ghash.io:3333
stratum.mining.eligius.st:3334
|
|
5) Troubleshooting
|
Problem
I screwed up my settings and can't get access. Miner isn't shown on the router, but network cable is plugged in and fans are on. My cables are braided or aren't color coded. I still can't get it to work! |
Solution
- Press the reset button five times, wait five seconds, then press a further five times. The miner will NOT restart, but it will reset the settings to default (as a DHCP client). - Remember to plug in the control board with a 4 pin molex! - See below diagram for pin-outs. 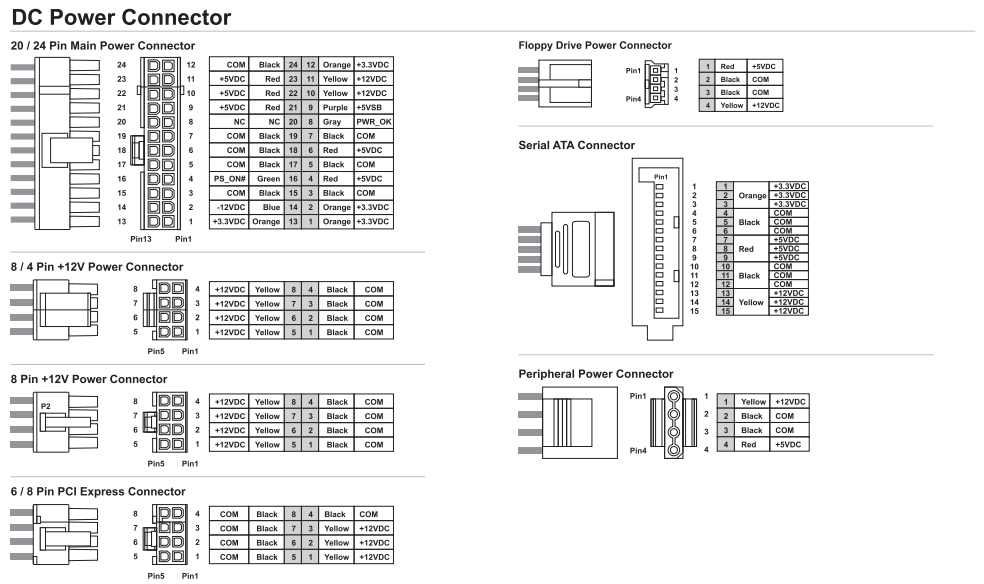
- Post here.
|
Disclaimer: No warranty is provided with this information. It is your own responsibility if you or your property are injured or damaged following the information.
6) Where to buy


|
|
|